Beamery Recipes are automated workflows that you can use to save time, nurture candidate relationships, identify relevant candidates and seamlessly manage candidates down the recruiting funnel. For each Recipe, select a trigger and an automated action, and apply filters so your Recipe works only for candidates meeting specific criteria.
Note: Only users with Admin role permissions (Super, Marketing, or Sourcing Admins) can create and edit recipes.
Table of Contents
How to Create a Recipe
How to Pause a Recipe
Failing Recipes
Failed Recipes
Recipes in progress
Recipe Errors
How to Manage Recipes
Recipe Owners
How to Create a Recipe
-
To create a Recipe, head to the Automation module by
your clicking on the lightning icon in the left-hand navigation panel. This
will take you to your Recipes list.
-
Familiarize yourself with the Recipes List page.
a. Switch back to the old Recipe List experience.
b. Add a new Recipe here.
c. Search and filter the Recipe List. You can search by Recipe name or filter the list by Status or Global Tags.
d. The Grid View allows you to easily see the most important details about a Recipe at a glance. This includes Status, Owner, the last time the Recipe was updated, and the number of times it's been used.
e. Edit a Recipe by clicking on the name of it.
f. Additional options found here allow you to duplicate, pause, or delete a recipe.
-
To create a new Recipe click on the Add Recipe Button,
this will take you to the Recipe builder.
-
First, give your recipe a title. You can also choose to attach a Global Tag
(or multiple Global Tags) to your Recipe. This can help you find and categorize
your Recipes later.
-
Next, choose the action that you would like to act as the trigger for the
subsequent action in the Beamery platform. You can apply one or more of the
following triggers:
- A contact's status is changed - You must specify which status they were changed to
- A contact is created in Beamery - You can specify a creation source or select any creation source
- A contact has submitted a Form - Only available to customers with Beamery Forms; optionally, you can specify which form, which question was answered and the answer that was given (for dropdown only)
- A contact is added to a Vacancy - You can specify a vacancy or select 'any vacancy'
- A contact's Vacancy Stage is changed - You must specify which stage they were changed to
- A contact is added to a Pool - You can specify the particular pool or select 'any pool'
- A contact has unsubscribed - Meaning they have clicked the ' unsubscribe' link within a Campaign
- A contact has submitted consent - This is available to customers using Beamery's advanced compliance features
- A contact is checked - Only available for some customers, this trigger checks for contacts in your database matching the filters applied in the next step (choosing this option will make Filters required). Learn more here.
-
A contacted submitted a flow - Only available
for organizations with Convert as
part of their Beamery package, this trigger allows you to take action
on contacts who have submitted a Flow.
You may also select multiple triggers if relevant. Note that this means the recipe will fire if either trigger occurs, rather than requiring that they occur simultaneously.
-
Filters are optional but can help you ensure your recipe applies only to
a very specific set of candidates. The filter options in Recipes are exactly
the same as those available in the CRM grid view.
If you are using the trigger "contact checked every X hour(s)" then you are required to add a filter.
A Note on Filter Logic
It is important to be careful when applying filters to make sure the logic operators (AND or OR, ALL and ANY) are applied in a way that gets you the outcome you expect. This is best illustrated with some examples.
First, we'll look at the logic between filters. This is the AND - Match all and OR - Match any logic that you can toggle at the top left of the filters panel and impacts the logic used between filters of different types. Unless changed by you, the default logic is AND - Match all, meaning all conditions indicated by the filters must be true for contacts to be actioned by the recipe.
For example, in the filter configuration below, the resulting list of contacts are in the "Operations" pool AND do not have the Global Tag "DEPT - HR" on their profile.
If we click on the AND - Match all button to switch it to OR - Match any, then the list of contacts changes. This is because the list now includes all the contacts in the "Operations" pool in addition to all the contacts who do not have the Global Tag "DEPT - HR" on their profile. This means the recipe will action the contacts who have both conditions true but it will also action the contacts who have just one of the conditions true.
Similar care should be taken when considering the logic within multiple instances of the same filter. By default, when you click "+Add additional" to add another instance of the same filter type, the logic is OR - Match any. This is shown visually as an OR between each additional filter and by the OR - Match any shown at the bottom left below the last iteration of the filter.
In the example below, the list of contacts to be actioned includes anyone who is a member of any of the three pools indicated. That means every member of the "Operations" pool, every member of the "Women in Tech - Summer 2021" pool and every member of the "Recruiters and Talent Acquisition" pool will be actioned.
However, if we toggle the OR - Match any at the bottom of the filter to AND - Match all, then the list of contacts changes (and the word between the filters changes to AND).
-
Select the action(s) to be taken for candidates who meet the criteria you
have specified in the trigger and filter steps:
- Add to Campaign - You must specify the campaign
- Remove from Campaign - You must specify the campaign
- Add to Pool - You must specify the pool
- Remove from Pool - You must specify the pool
- Assign to Vacancy - You must specify the vacancy
- Remove from Vacancy - You must specify the vacancy
- Update status - You must specify the status
- Set assigned to - You must specify a user to assign contact ownership to
- Add a Global Tag - Select from your list of existing Global Tags
- Remove Global Tag - Select a specific Global Tag to remove from a contact profile
- Update Custom Field - Set a response to a custom field on the contact profile
- Remove Custom Field - Clear a response to a custom field on the contact profile
- Add to ATS - For clients using an ATS integration
- Assign to source - You must specify the source
- Add Profile Tag - You can choose from previously used profile tags or create a new one
-
Update Communication status:
- Do Not Contact - Prevents contact from being added to campaigns or sent direct messages
- Ok to Contact - Contacts previously marked 'Do Not Contact' can now receive messages again
-
Update Campaign Status:
- Do Not Campaign - Prevents contacts from being added to campaigns, but they can still receive direct messages
- Ok to Campaign - Contacts previously marked 'Do Not Campaign' can now receive campaigns again
- Anonymize - Removes the profile so that same contact cannot be added again. Anonymize is only available as an option in Recipes to clients using Beamery's advanced compliance features.
- Archive - Archives the contact profile; reversible
- Delete - Deletes the profile; deleting a profile via a recipe is not reversible
- Update Confidentiality - Marks profiles as confidential and/or shares them with only specific users (only available to customers with Executive Search features).
- Update Contact Type - Not available for all customers, use this feature to assign a contact type (Alumni, External Contact, or Employee) to a profile.
-
Add Profile Tag - Adds a Profile Tag to a contact's
profile.
You may also select multiple actions if relevant. Note that this means the recipe will act on all actions specified.
- The option for Repeat Recipe will allow the recipe to run on individual contacts repeatedly. Without this option checked, a recipe can only act on a contact one time. If your Recipe should be able to run on a contact profile repeatedly, check the Repeat Recipe box.
- Once you have decided on your actions, click Continue to move on to the Review step.
- Here, you will see a section where you can review your Recipe. If you would like to make change to your Recipe, you can return to any step by clicking on it. Once you are happy with your Recipe, click the Activate button, then confirm that you would like to activate your Recipe.
- Your Recipe has now been created and is active. You will see it in the Recipes List.
How to Pause a Recipe
You can pause a Recipe if you only want it active momentarily, or you wish to temporarily disable it.
Within the new version of the Recipe list, follow these steps:
- Click the vertical ellipses next to the Recipe you would like to pause, and select Pause.
- Confirm the action by clicking 'Pause Recipe'.
- To resume, use the ellipses to click 'Resume Recipe'
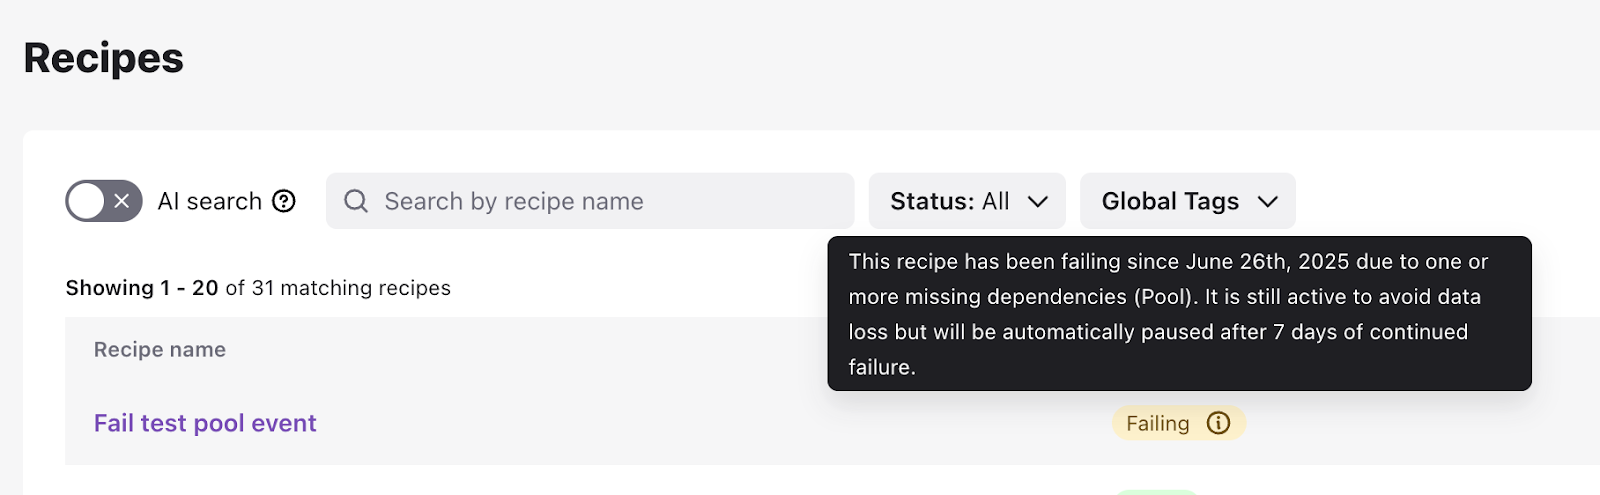
Failing Recipes
When a recipe is marked as Failing, it means something has gone wrong — usually due to a missing dependency (like a deleted pool or field). Events triggered during this time are not lost. Instead, they’re stored in a failed queue and can be replayed once the issue is fixed.
To avoid data loss, we don’t pause failing recipes right away. We give it 7 days to recover. If the problem continues beyond that, the recipe is automatically paused to prevent further errors and will change status to ‘Failed’.
To identify failed recipes, filter by Recipe Status - Failing. Failing Recipes will have an amber warning next to the name along with how long ago since they started failing and the failure reason.
Failed Recipes
Recipes will fail for one of two reasons. Either an object tied to that recipe is missing or the user who created it has been deleted. When a recipe fails, the owner of the recipe or the Super Admins if no owner exists, will receive an email with the details of the recipe failure and steps that can be taken to fix it.
To identify failed recipes, filter by Recipe Status - Failed. Failed Recipes will have a red warning next to the name along with how long ago they failed and the failure reason.
Recipes in progress
For time-interval recipes (recipes that run on a schedule), a loading indicator will appear next to the recipe name while it is running. This provides real-time visibility into its progress.
What the loading indicator shows:
When you hover over the indicator, you’ll see:
- The estimated number of contacts being updated (based on how many matched the filter at the start of the run)
- The current progress
- The start time of the run
There is no need to refresh the page — this information updates automatically as the recipe runs.
This allows you to monitor recipe performance without leaving the page or manually checking status updates.
Recipe Errors
A recipe will be disabled when it has errors that must be fixed manually. In such a case, the recipe will attempt to run 3 times and then, if still unsuccessful, the recipe will be disabled automatically.
If an Event based recipe has errors, it will not be disabled but you will see an error notification. These recipes will remain in queue so that they can be replayed once the recipe is healthy again.
How to Manage your Recipes
On the Recipes list, you have 3 main ways of sorting through your recipe list:
Search: You can easily sort by searching for the name of your recipe
Status: Search through All recipes that are set to "All", "Active", "Pause", "GDPR", or "Failed" statuses
Global Tag: search/select from a list of global tags that is associated to your recipe
Recipe Owners
It is important to note that if you need to delete a users, you should first audit all recipes that user owns. There are 2 scenarios for this: soft delete of a user and hard delete of a user.
Soft Delete of a User is the preferred method and can be preformed in Settings and only by admins.
For time interval recipes, when a user is soft deleted, the recipe will be disabled.
For an event recipe, your organization's super admins will be alerted via email as to which recipes are impacted by the deletion of that user.
Hard Delete of a User is a function performed on the back-end and needs to be requested by submitting a ticket. Please be aware that if this action is preformed, any recipes created by hard deleted users will fail. If you wish to preform a hard delete of user(s), please audit your recipe list before requesting the work. Any recipes created by a user slated for hard delete must be remade or reassigned before deletion can occur. Your Customer Success Manager or Product Support can help advise you on how to proceed.
For more information on user management, click here.