Campaigns in Beamery can be used to create highly personalized email messages to target a large group of candidates in your CRM. If a candidate fails to open their first email, or if they don't click on a link, you can schedule automatic follow-ups to source or nurture new candidate relationships.
Please note that not all user permission levels in Beamery can create Campaigns, learn more here.
Campaign List Diagram
a. Search for a Campaign by its title or filter by Campaign type. Campaign type will default in this view to Your Campaigns.
b. Access additional menu options
1. Overall Campaign Analytics
2. Manage your email templates (Use this page to create, edit, duplicate, rename or delete email templates)
3. Manage your Campaign Settings*
c. Create a new Campaign
d. View individual email Touches within a Campaign
e. Email preview
f. View individual Campaign analytics details, export Campaign metrics to a CSV, duplicate or cancel a Campaign
g. Campaign overview (including important analytics)
* Campaign settings is available to users with permissions of Super Admin, Admin, Marketing Admin or API user. Use this page to manage which content tools are available to users, assign brand colors, set a default background color for emails, and manage which fonts are available to be used in Campaigns.
How to Create a Campaign
1. You can create a new campaign from the Campaigns list page. To access this, click on the Campaign icon on the left-hand navigation bar.
2. Click on the Add Campaign button in the top right corner to launch the campaign builder.
3. This will take you to the Campaign set up page where you will name your Campaign.
4. Then, choose a Campaign type. There are three campaign types available in Beamery:
a. A Single campaign is one email touch point which you can personalize with variables and send to a group of candidates
b. A Dynamic campaign is a multi-touch campaign which allows you to schedule automatic follow-ups according to recipient behaviors
c. A Triggered campaign can have one or more touchpoints and recipients are added to the campaign automatically via a Recipe after the campaign is launched.
You can lean more about which Campaign type is right for you by clicking here.
5. Next you may choose a verified email address to send your campaign from.
6. Click Continue
7. Now you will be taken to the Campaign Builder screen where you will begin building your first campaign touch.
8. First, enter a subject for your email and decide when you would like the email to send. Choosing Immediately means a recipient will receive an email as soon as they are added to the campaign. You can delay the initial send by choosing Send later under Time. Then select the number of days you wish to delay and the time of day you want the email sent. You may also chose to send the message on a specific day. This option works best for Campaigns associated with an event, rather than evergreen campaigns.
Note: The time of day you choose to send an email is based on your time zone, not the recipients’ time zone.
9. Save the changes to your campaign by clicking Save draft in the top right.
10. Next, click Edit to move into the new Campaign Editor.
11. Choose the type of Campaign you wish to build. Choices are:
- Visual Builder (recommended) - best for simple, no-coding solution to mobile-ready emails.
- Quick Message - best for text-first communication.
-
Custom HTML - an advanced solution for coding custom email designs.
Visual Builder Diagram
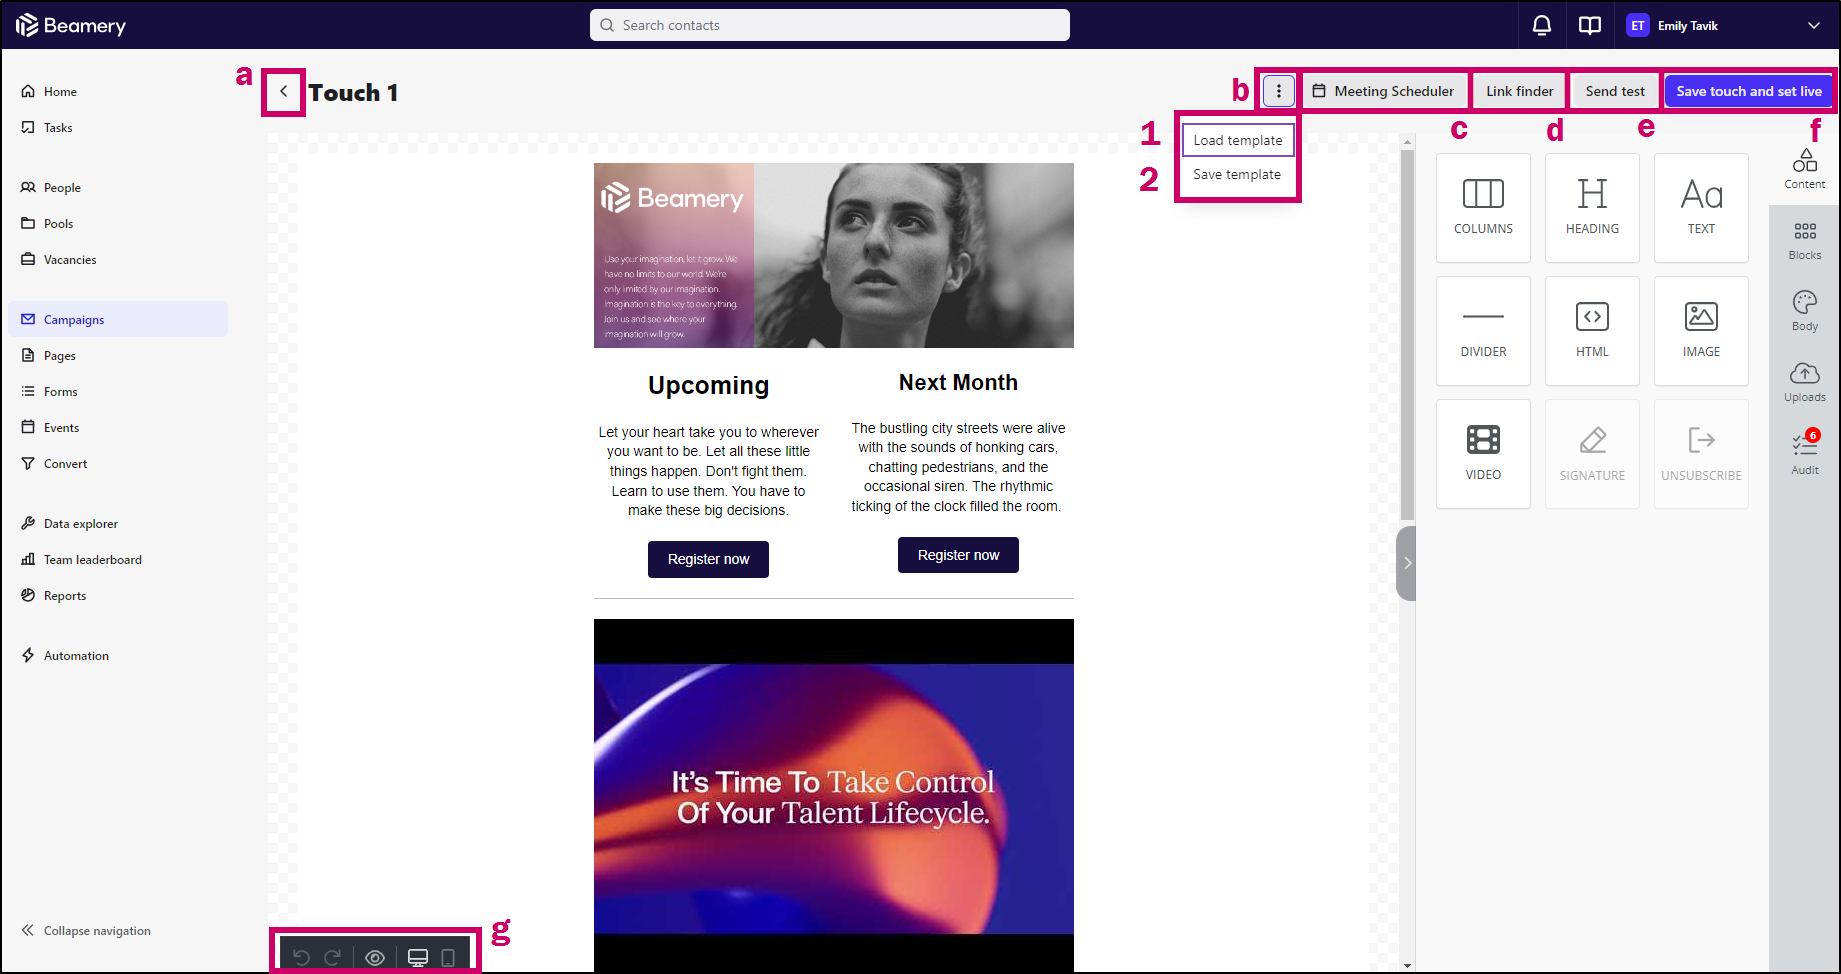
a. Click to go back to the Campaign Overview page
b. Templates options
1. Load Template - Load an existing email template into your workspace
2. Save Template - Save an email you've created in your workspace as a template to be used by everyone in your organization
c. Create a Meeting Scheduler link to allow others to book meetings with you
d. Easily insert the link to a Convert Flow into your email message
e. Send a test of the email message to preview and edit your work
f. Save your work and Launch the Campaign
g. Undo, Redo, Preview and Toggle desktop to mobile views
View the Building Campaigns in Visual Builder article for step by step on building a detailed campaign.
12. Once you have finished editing your campaign, save your work and return to the Campaign Overview page.
13. If you're creating a Dynamic campaign and would like to add another touchpoint, scroll down and click on the 'Add touch'.
14. Before composing your second touchpoint, you can select the rule upon which your next touchpoint will send according to a selection of recipient actions. You can do this through the “Select a rule” drop down. You can select from the following options:
a. If "no reply" to previous touch
b. If "reply" to previous touch
c. If "no click" to previous touch
d. If "click" to previous touch
e. If "no open" to previous touch
f. If "open" to previous touch
15. Once you have selected a rule to trigger the second touch point and specified when you would like to send it (no. of days after the first touch point is sent), you can compose your second touch point in exactly the same way as you did the first.
16. If you need to delete a touch point, simply click delete within the touch point scheduling window.
a. If you would like to add further touchpoints, you can repeat this process as necessary.
16. Next, you will need to select your recipients for your campaign.
18. You can combine filters like Pool and Status to narrow your selection to the most relevant candidates in your CRM. We recommend adding candidates by Pool as it makes it easier to target your campaign towards a specific candidate group or persona.
You can always remove a filter by clicking on Remove Filter. You will see a snapshot of candidates added to your campaign with a summary of the number of matching recipients.
Additionally, email campaigns can be always-on and continually filled via automations called Recipes. You can read more about Recipes here.
19. We recommend that users preview or send a test email before launching the campaign. To send a test for a single touch point, click on the Send Test button on that touch point. Enter the email address that you would like to send the test message to and click Send.
20. When you have completed your campaign and reviewed your build, click on the Set Live button located in the top right of your screen.
21. After you have launched your campaign, it will appear in your Campaigns list. You can use Beamery's Campaign Analytics reporting to understand the performance of your Campaign.